Contact Us

We'd love to hear from you! Contact us and let's get the conversation started!

Share with us what you'd love to preserve about your life and what roadblocks have you encountered that have prevented you so far!


Boston, MA
USA

6174337593

Pause || Blog

Blog with real life stories and inspiring content for memory keepers and life documentarians.

Filtering by Category: Frame Your Life

Creative Self Portraits

Kiera Slye

2020.03.25_Charlie Maternity-17.jpg

Don’t Let the Pandemic Take You Out of The Picture

At the beginning of the pandemic, in an effort to distract my daughter from yet another YouTube video, I started flipping through my camera roll. I shared photos and videos I had taken over the years and it provided for a few solid minutes of entertainment for both of us as we took a virtual trip down memory lane.

The only problem… every time my daughter saw a photo or video, she’d ask:

“But where’s Mommy?”

I am a photographer and the chief storyteller over here at the Frame of Life Project. I am the self appointed documentarian in our family and yet, somehow I still failed to show up in the “picture story” of our lives.

This conversation with my daughter was a punch in the gut. I have prided myself with documenting the details of our life, but I left out one of the main characters… myself. I thought that by just taking the videos and sharing the stories, that I was showing life through my perspective, and I guess, by osmosis I would be a part of it.

But the sad truth was, my daughter was right. Viewed through her eyes, I quite simply wasn’t in the picture of her life. This is when I made it my mission to show up in more photos. I was determined not to let my new squishy postpartum and sleep deprived body, or lack of having a personal photographer following me around, get in my way of being photographed in more of the “everyday” moments of our family life.

I believe it is so important to show up for our kids & become a part of the visual story.

Giving birth during the pandemic fast forwarded my mission. Normally, this would be a time that I would have hired a photographer to spend time with our family throughout the year documenting all of the many major milestones that take place within the first few months of life.

All plans flew out the window when the world seemed to jolt to a halt, just two weeks before I gave birth in early 2020. Suddenly, we had to adjust to living quarantined life during the height of a global pandemic. In a time when it was no longer safe to be in close contact with people outside of your immediate family bubble, I focused on leaning into the challenge of documenting my own life (with me in the picture too.) I found the challenge therapeutic and rewarding.

Rather than keep the lessons I learned through a whole lot of trial and error to myself, I thought I’d share my 3 biggest tips with you today.

Self Portrait Tips.png

1 || Find Tripods in Everyday Items

Tripods are everywhere if you get creative. The camera I use most often is the one I have on me nearly all the time — my iPhone. That thing can fit pretty much everywhere. Lately, my most commonly used tripods have been tree branches, my stroller and a random fire hydrant in the neighborhood. You can take some pretty unique photos when you think “outside the box” or off the pins of a traditional tripod and search for places to lean your camera against.

2 || Remote Triggers & The 10s Timer

Series captured using remote trigger + Canon 5dMkiii + Tripod

Series captured using remote trigger + Canon 5dMkiii + Tripod

Most DSLR cameras and all modern cellphone cameras have self timer functionality. There typically are 2 options: a 2-3s timer and a 10s timer. I have found the most success with the longer timer, especially when photographing with my kiddos.

On my iPhone, I use the 10s timer to take most of my portraits. This gives me time to set the phone up, set the AF Lock to focus the image where I will be standing, and run to get in the image. It is also helpful to use the forward facing camera so that you can see the scene and more easily hit the “shutter” button.

I am not a cool enough kid to own an apple watch, but if you do — you can use your watch face to press the shutter button / trigger the timer to begin. If this is the case, you could use a shorter timer to have better chances of capturing the moment.

If using a DSLR camera, focus can be a little harder to see in real time. It typically takes a few tries to set the focus right. Turn off the AF function on your lens, and set the manual focus using your hands to twist the lens. Also try shooting at a higher aperture to increase the chances of capturing an image in focus.

3 || Have Fun

2020.04.25- Charlie Week 3 Newborn PhotosLR-1851.jpg

It is a VERY rare occasion to capture the perfect “selfie” on your first try. The beauty of living in a digital world is that you can take multiple photos and delete all that don’t work. So don’t beat yourself up if it takes a few times to get the “best” image. When using the timer function on the iPhone - you will capture a 10 image “burst” of images when the shutter snaps, giving you a few options to choose from within a 1-2s window of time. You can find these by clicking “edit” on the image when you go back and review your files.

Most importantly, don’t forget to have fun with this. Get creative. Practice often. Be silly. You won’t regret having some of these images later. Some of my most favorite images are from the “outtakes” — those are the moments where life feels the most real. I hope you try this at home and walk away with some new fun memories that you can share for generations to come! Capture an amazing shot? Share it with me over on Instagram.


Quick Tips to Manage Digital Photos and Make Albums Quickly

Kiera Slye

This month, I am tackling some MAJOR projects on my dream list:

  • Photo Album documenting our journey from Boston to the Burbs: (the last 2 years of life documented by our Family Photographer, Karen Kelly.)

  • Our Wedding Album - It’s been 5 years!

  • A gift for Me: Updating and re-printing a photo album documenting my motherhood journey and comparing it with my mom’s journey with me; and

  • Our Family Yearbook from 2018 (and then 2017 - because I haven’t done that either)

I am a busy mama and I have had to come up with some systems to make organizing and tackling these photo projects simple, doable and fun.

Creating my to do list photo projects has never been easier since creating our Private Facebook Community where we provide each other accountability, support and inspiration as we tackle our dream photo projects. We’ve got a crew of great people already getting started as we speak and would LOVE to have you along to help support you through your journey as well! !

This is a hefty blog post with tons of tips and tricks for managing your digital image collections and to help making photo projects easy! Grab a cup of coffee or glass of wine and let’s jump in to it!

COMPUTER BASED TIPS:

If you’re a visual learner, I have created a series of quick tutorial videos you can binge watch. These videos will show you what I am talking about below.

Organize Digital Photos in Folders by Year, then Month

This simple step allows you to quickly start identifying your universe of photos for photo projects. Within each month you can add separate folders for key events (i.e. birthdays, milestones or special events) but for simplicity sake a folder for year and then month is good enough to get you already so much more organized! Below is a quick 2 minute video of what I am talking about!

Make a “Best Of” Folder for the Most Favorites for the Year.

Within your Annual Folder, create a separate “Best Of” Folder. In this folder, anytime you take a picture and you instantly know it’s an iconic image that you will remember for all time or it becomes your favorite photo, throw it in here. You can separate this “Best of” Folder by month as well to stay even more organized. Being picky about selecting favorites will help you have fewer photos in the universe to consider at the end of the year.

Schedule 10 Minutes Each Month To Pick and Save Your Favorites

At the end of each month, go through your photos and pick your most favorites from each month to include in the “Best Of” folder. Some months will be more monumental and might have more moments than others (and that’s ok!) But as a general rule, I try to get myself to pick only the top 5-10. And yes… some months I have 50! But it’s still way less than 1,000’s at the end of the year, so I consider that a win!

Use Descriptive Filenames for Saving Photos [On a Computer]

You can customize filenames in many different ways on your computer: At import, export, or by renaming the files. Start file names with the date the photo was taken so that you can easily sort chronologically. Here are a few examples of good descriptive filenames:

  • 2019_01_07_willas_2nd_birthday

  • 2019_05_charleston_vacation

  • 2019_christmas

  • 2019_07_19_willa_tougas_farm

Using descriptive file names will help you search your files at a later date. You can also select to have the filename printed on the back of your photos with some companies simply by checking a box at checkout. Then you have an automatic date stamp and quick description on your printed photos without having to take an additional step.

Get Started with Catching Up for This Year First

Currently, it’s February. It’s a perfect time to have some content to get started with to create a system for making finding your favorite images from this year super simple and quick at the end of the year. If you’re reading this later in the year -- don’t worry! It is never too late to start this process! By setting up a file organizing structure for the current year, you will hone the skill for repeating it to address previous years and will be ready to rock and roll next year!

Taking the time now to create a system will help you get caught up so that each month you can take just 5-10 minutes to select your favorites from the month and move forward. At the end of the year, you will have a folder with just your top favorites and you will be able to make your Annual Photo album in no time at all! Ahh, doesn’t that already fill your lungs with air?

Once you’re caught up, you can go back and start organizing old photos.

Organize Older Photos Starting Chronologically from Last Year

Set realistic goals and tackle just one year at a time starting with the most recent. Use the same system, except it will be quickest and easiest to limit your folder breakdown to just the year (i.e. 2018 photos / 2017 photos etc.) Here is a link to a video I created to show you how I use Adobe Bridge to view, sort, and select my favorite photos each year.

Gather all your photos from your hard drives, cloud, or desktop and put them all in one place in a new folder that you have created for that year. Once you are certain they are all in that folder, I recommend creating a backup of this annual folder (on either an external hard drive or another cloud based service).  This is my favorite go to brand for external hard drives. I get a new one each year for my photo storage and backup.

You should also consider loading your annual folder to Google Photos or Dropbox or some other cloud based service like Amazon Cloud. Check into the paid subscriptions to allow for more storage space and higher resolution backup options. Backing up to multiple sources helps ensure your images are safe from disaster. I recommend having at least 1 full backup of your digital files before you start deleting and moving too many things around.

Once your images are backed up, create a “Best Of” folder on your hard drive. I suggest downloading Adobe Bridge - it is a software that is offered for free through Adobe Creative Cloud and is a great tool to use for quickly viewing, selecting and updating file info (including renaming files) of your favorite images from a bulk collection. Above is a link to a video I have created that shows my quick and easy method for selecting favorites, copying them to my hard drive, and bulk renaming files to ensure that they appear chronologically. This makes making an album super easy later.

ON A SMARTPHONE

Organizing Phone Photos:

If you’re anything like me, you’ve got 10x more cell phone photos than fancy camera photos. I bet most of your favorites images are even taken on your phone! Here are some helpful tips for organizing and backing up your smartphone photos and videos.

Cloud based backup

If you’re not already signed up for a cloud based service like Google Photos, Dropbox or Amazon Cloud, I highly suggest signing up for one (or all of these) services to help back up, store and organize your photos. These services each work on your computer and also have an app that you can download to use on your phone. There are paid upgrades you can purchase for more storage and higher resolution backup offerings that I would also highly recommend. If you have thousands of photos, this backup could take several days, so be patient as it loads in the background. Also make sure you’re logged into your wifi to help save cellular data!

Another super cool service to look into is called IFTT - it is a free platform that helps you connect and link your apps and devices for creative backup strategies. I use it to link my Instagram and Facebook posts to automatically be backed up to Dropbox. You can also select certain hashtags to follow that can be automatically backed up to Dropbox as well. I used this service to follow my wedding hashtag so all of my friends’ posts ended up in one place and I was sure to see them! There are tons more options available so when you have time to jump down that fun rabbit hole, check it out!

Utilize the “favorites” button to select your favorite photos each day (and delete the rest!)

On the iphone, you can select (“heart”) your favorite images. On an android phone or in google photos, you use the “star” button. When you add a heart or a star to the image, that image is automatically flagged and stored in a “favorites” default album on your phone. You can find this by clicking on the album view within your photos app.

When you view your camera roll in a grid view, you will see the heart or star symbol on your favorite photos. I use this as a guide for bulk deleting excess images that are my outtakes and save photo storage room on my phone. You can do so by clicking the select button, then selecting all of the images and movies that don’t have the heart symbol and then click the trash can to delete them.

In an ideal world, I do this daily at night after my daughter goes to bed and I inevitably end up going through the photos from the day to see her sweet face. It’s a great exercise to do at a minimum weekly though so that you don’t get too backed up.  

Create Best Of Album

On your phone in the camera uploads app, and in each of these cloud based services, you can create albums for your photos. Your photos will automatically be stored chronologically on your phone.

You can create albums to help organize your photos by event or by year. I suggest creating a “Best Of” folder on your phone and on the cloud based service for your all time favorite photos from the year for printing in photobooks.. Set it up by year (i.e. 2019 Best of) and put only your absolute most favorites in this folder.

Search photos

Your camera app, Google Photos and I believe Amazon Cloud all have built in face recognition and geolocation tagging and search functions now. You can click on a person’s face and create a name for that person. Then, later, you can type that person’s name in and search photos of only that person. I have tested out this search function using google photos and found that you can even find photos of things if you describe them! It was creepy for sure, but also super helpful! When you search photos, you can then create new albums for certain events or of certain people so that your photos are organized even further.


Print Photos Using Apps
Many printing companies have apps that will allow you to create photo books using your phone photos. They can also access your google photos, dropbox and often Amazon Cloud accounts to pull images. If you have created albums on your phone, you can elect to create books from just those albums.

I made a google photo book of my parents with my daughter for Christmas in less than 15 minutes just by simply using the Google Photos app and selecting the folder of images I created from a search of photos with my mom and stepdad in them. The book was super easy to make and cost $30!  I highly recommend this if you’re looking for a quick and easy way to print and share your favorite cell phone photos.

Use Chatbooks for super cute decent quality for low cost photo books using cell phone shots. You can subscribe and set up for it to create photo books every 60 photos from a folder on your phone or google photos. I set mine up using my favorites folder on my phone.

MAKING THE ALBUM

I suggest spending just 30 minutes going through your options for album companies, picking one and sticking with it. Import your “best of” folder and start making your album. Your images should now be ordered chronologically and all of your favorites should already be selected. So the making of the album shouldn’t take you long. You’ll simply be dragging and dropping your favorite images into the template of your choice and then within a few minutes (or hours if you’re picky) your project will be complete!

This has been one humungous blog post and I know that there’s a ton to digest. I am always happy to answer questions in the comments or can be reached by email at frameoflifeproject@gmail.com. Better yet, let’s connect on Instagram or Facebook!

Documenting Holiday Memories

Kiera Slye

Blog Header Documenting Holiday Memories.jpg
...there are little nuggets of magic and joy all around you. Sometimes, you might not feel them right away, but time has a magical way of helping your mind see through some of the pain and find the light in hindsight.
— Kiera Liu 2018

Is there one Christmas that sticks out in your mind where all the magic just came together and it is one that you will always remember? Do you have certain family traditions that you do every year for the Holidays that you never want to forget? Or, are you in a period of growth and change and the Holidays just suck and you wish they weren’t happening right now? If so -- I hear you and I get you. I’ve got some insight I want to share.

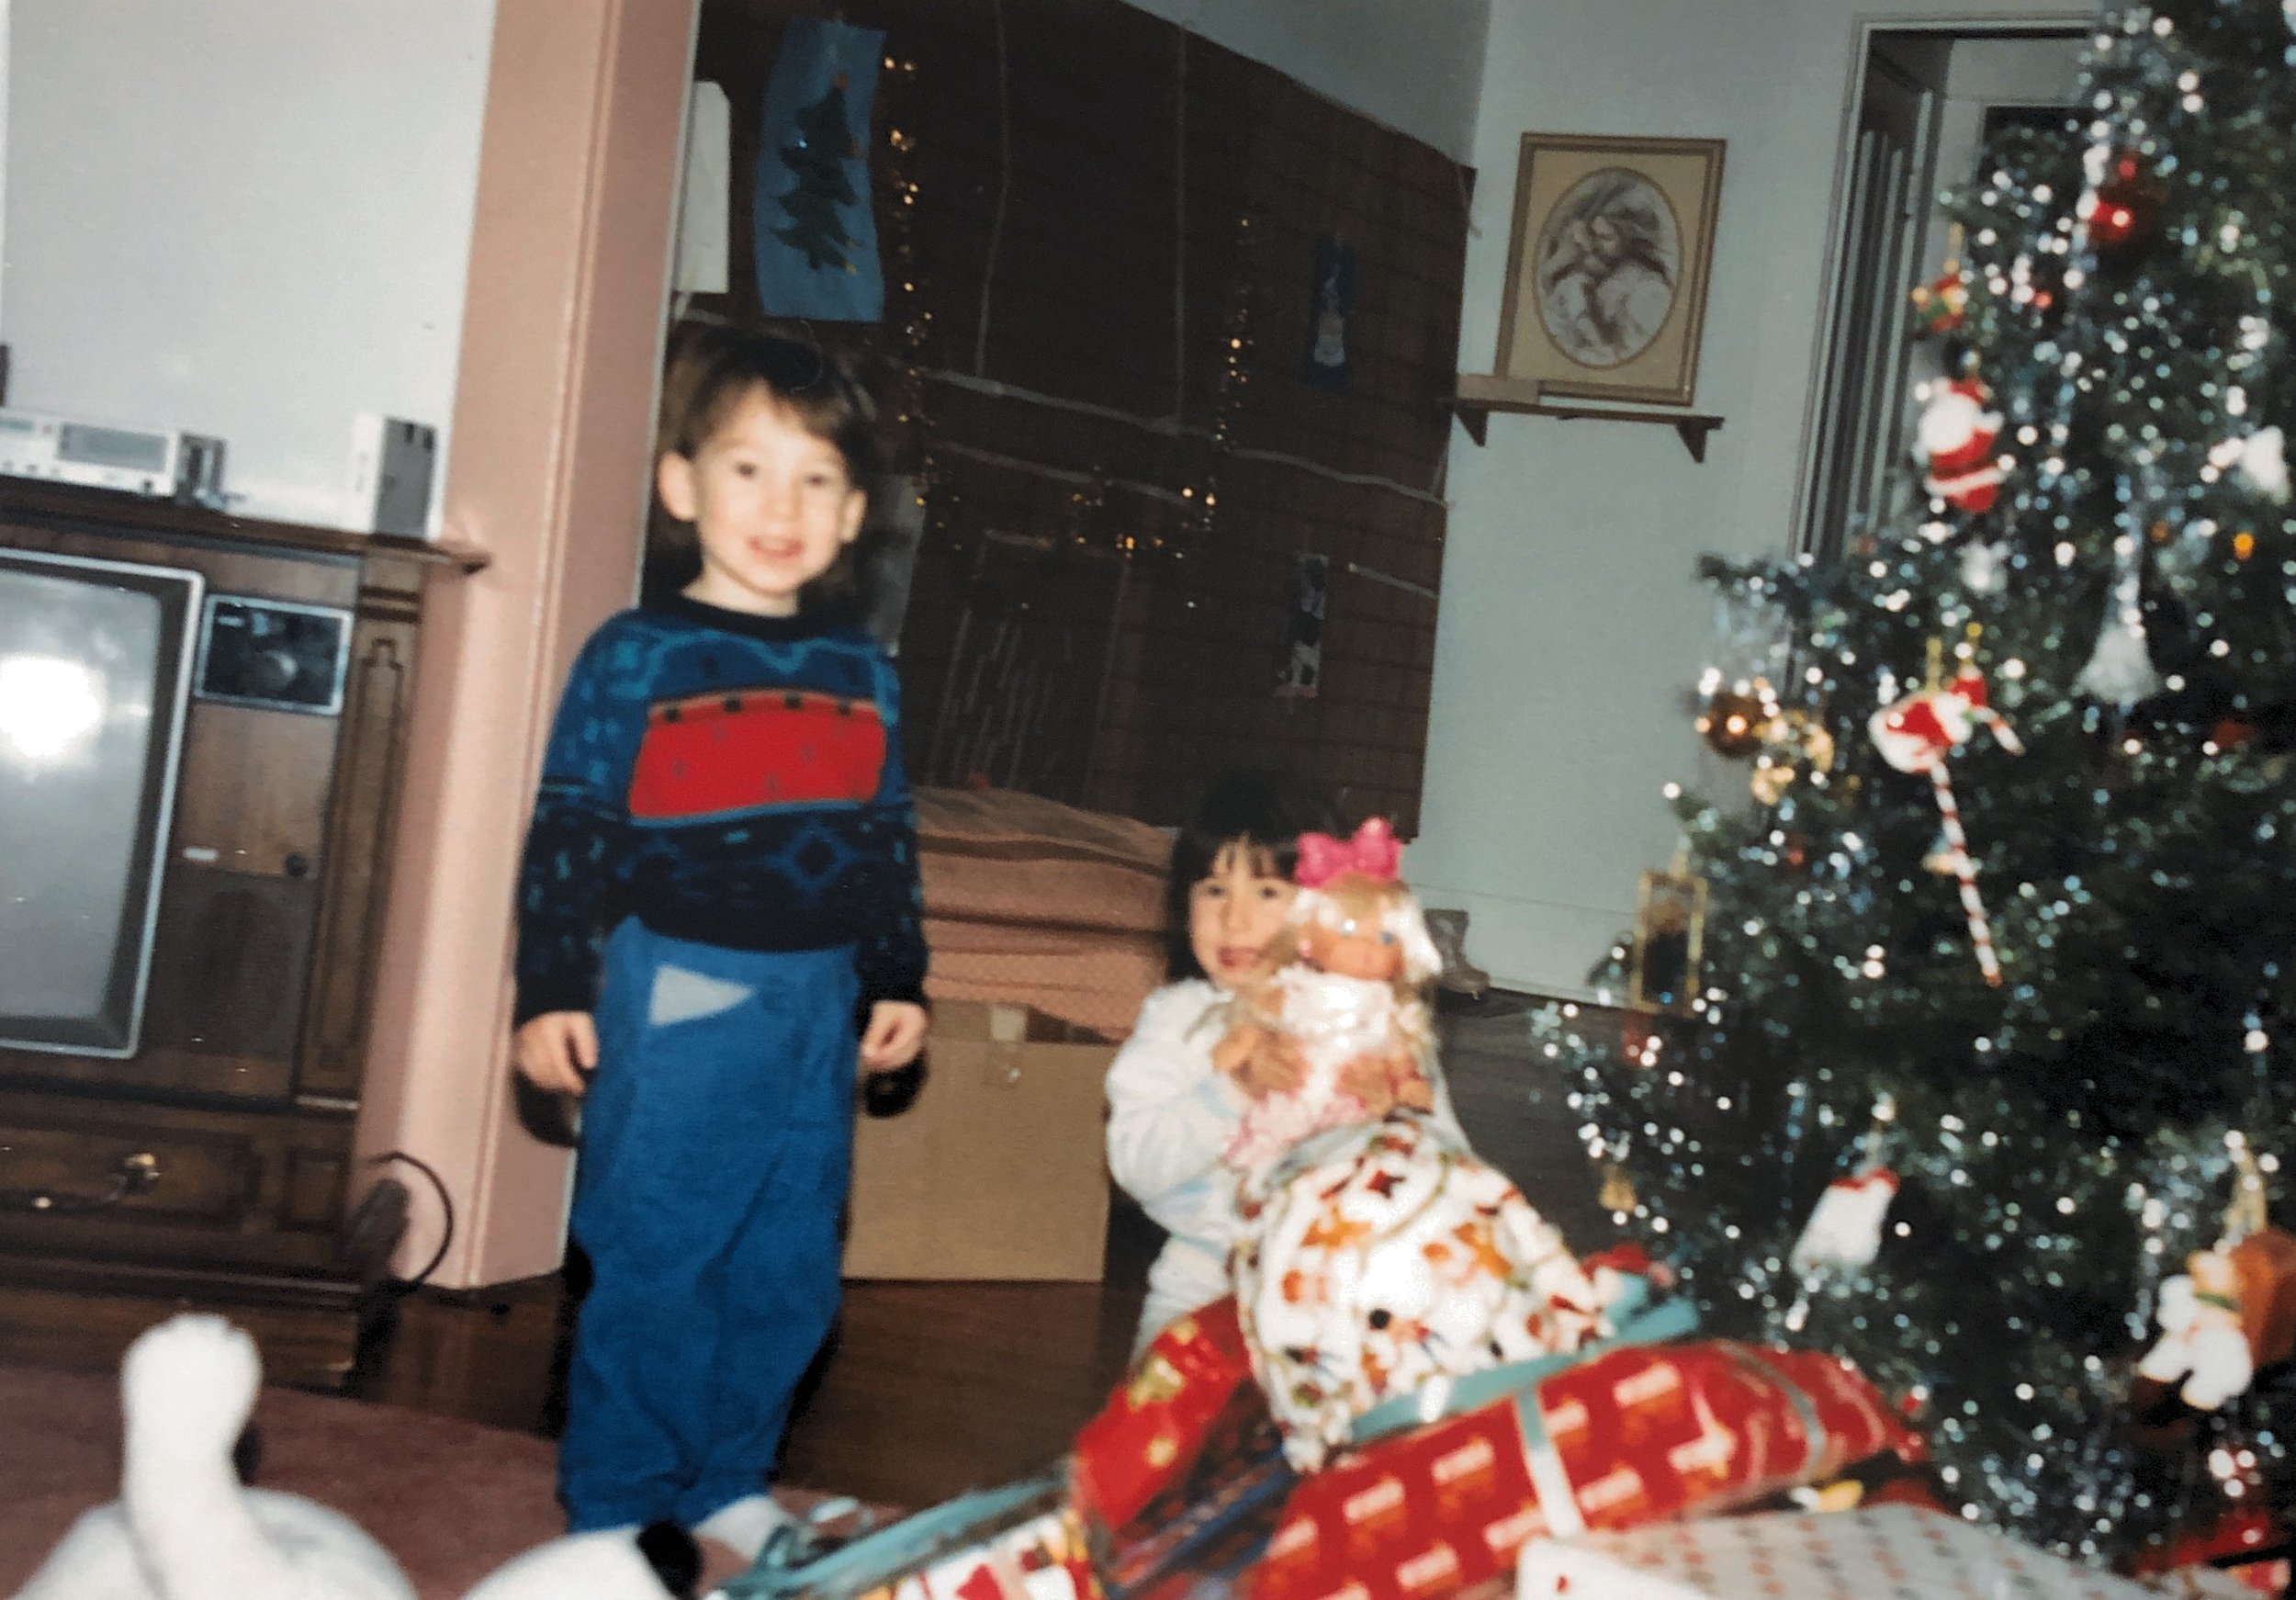
One photo can spark a handfuls of memories. This photo is one of those for me. This is an image from the first Christmas I can truly remember. Christmas 1989. It was the year I received the gift I had wanted most from Santa and is one that I still have to this very day! My light up sparkly princess doll! This wasn’t just a battery operated doll with plastic glowing lights, it was a symbol of light and a beacon of hope for the future.

Christmas 1989 Rochester, New York

Christmas 1989 Rochester, New York

At 5 years old, I was in the middle of a transitioning through the turmoil of having my nuclear family break up. My mom and my biological father divorced the year prior. It wasn’t an easy or fun time for our family, but we were doing the best we could to find ways to be silly and find joy in our new life.

I remember that my mom was trying desperately hard to make Christmas magic for us again. As a 5 year old, I asked all the questions one would expect:

We had just moved so “How would Santa find our new house?”

We didn’t have a fireplace so “How would Santa get into our new house?”

“Was Santa really watching all the time-- because that’s kinda creepy?”

“Will he even hear my wishes for the magical light up princess doll?”

All of these questions were answered when I woke up Christmas morning hugging my magical Sparkly Princess Doll. Santa had found our new apartment and had come down the paper chimney that my mom had hand drawn on the wall with wrapping paper. It was a Christmas Miracle and I am so glad my mom documented this moment for me to be able to share with you almost 30 years later!

With my Nonnie proudly showing off my Sparkly Princess Doll - Christmas 1989.

With my Nonnie proudly showing off my Sparkly Princess Doll - Christmas 1989.

One key thing I have learned through photographing through all of the good and hard times in my life is that there are little nuggets of magic and joy all around you. Sometimes, you might not feel them right away, but time has a magical way of helping your mind see through some of the pain and find the light in hindsight.

I am sharing this story with you in hopes that whatever you are going through this holiday season, you can take a second to sit down and document it.

Use your cell phone or Camera and photograph what your home looks like right now on the surface level.

Did you decorate your home this year?

Are you traveling to see family or friends?

Are there special traditions you do every year that you don’t want to forget?

Is there a story about your year this year that you want to be able to share with your future generations?

Consider taking short video clips of the sounds on Christmas morning or the sound of clinking forks on plates at Christmas Eve Dinner. Those sounds will fill your mind with memories years later.

Take one simple step and document your life NOW.

If you’re up for it- go a step further and hand write yourself a letter about right now or email yourself about what life is like right now. Print out that photograph and that email and put them in an envelope together to save for the future. Over this next year, I’ll share more ways you can work on your Time Capsule and ways for you to access your memories for years to come!

Merry Christmas and Happiest of Holidays to you all!


xoxo-
Kiera


P.S. I know you’re dying to see what Princess Sparkly Pants looks like today!

She was stored for 30 years and literally fell apart the second my toddler tried to touch her! Poor Sparkly Princess! Luckily, my father in law was here to help put her back together! I just don’t think she’ll be sparkling any time soon!